

We have explained what a subdomain is in this article, so now we’ll move on to creating one. The steps you need to take to create a subdomain depend on the type of control panel your hosting provider offers. So let’s go through the most popular control panels and see how to create subdomains using those.
Creating a subdomain in custom control panel
Since custom control panels are developed by hosting companies themselves, their interface and set of options may differ. Therefore, we can’t provide step-by-step instructions on each of them. One way to figure out how they work is to check the hosting company’s FAQ and find a detailed guide on creating a subdomain.
Creating a subdomain in cPanel
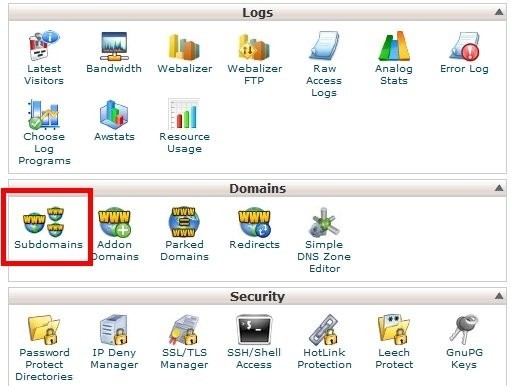
1. Find "Subdomains" in the "Domains" section on the homepage and click on it.
2. Enter the subdomain name in text box 1. Select the main in field 2. Text box 3 should be filled automatically. If not, that’s where you enter the root catalogue address for the new website (subdomain) and click "Create".
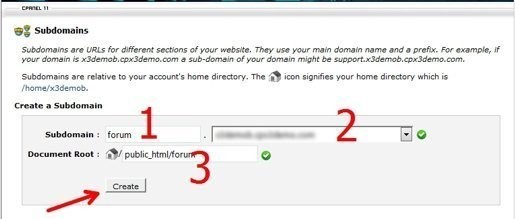
The folder is created automatically and once the website is uploaded it will start working.
Creating a subdomain in ISPmanager
1. Find "WWW domains" on the main page of the control panel.
2. Click "Create" or "Add".
3. Fill in the following text boxes:
Domain name:: the name of the subdomain you want to create.
Alias:: will fill in automatically.
Root folder: if you leave "auto" in this field, your website files should be uploaded to /www/subdomain.domain.com. If you need them to be uploaded elsewhere, type the address of the corresponding folder in this field.
Owner: select the user.
IP address: choose "enter the IP address in the next text box" in the first box. In the second one select the required IP address from the list. In some versions of this control panel, the IP address is filled in automatically and there’s only one text box.
Encoding: leave as it is.
Index page: enter the page name that will be displayed (usually that is index.php).
SSL: Check the checkbox, if an SSL certificate is going to be installed to this subdomain. In some ISPmanager versions, there are "HSTS" and "Redirect HTTP queries to HTTPS" options. For the SSL certificate to function correctly you need to check those checkboxes as well.
Creating a subdomain in PLESK
1. Select "Sites and domains" in the menu on the left.
2. Click "Add subdomain".
3. Enter the subdomain name in the "Subdomain name" text box (e.g. for test.yourdomain.com you enter "test") and select the main domain in the box to the right.
4. Enter the folder name where the website files will be located in the "Root folder" text box.
For the website to start working you need to upload the files to the root folder that will be created after filling in the details on the previous page. It might take 1-8 hours until the website becomes available. This period is required for the DNS records to propagate.
Note! You can create a subdomain in the domain settings by simply creating an A-record for the subdomain. With that done the root folder for the subdomain will not be created automatically and you’ll have to create it manually by adding the subdomain as a website. And that procedure is described above.